Manual Execution
This tutorial is similar to the programmable token transfers example. It demonstrates the use of Chainlink CCIP for transferring tokens and arbitrary data between smart contracts on different blockchains. A distinctive feature of this tutorial is that we intentionally set a very low gas limit when using CCIP to send our message. This low gas limit is designed to cause the execution on the destination chain to fail, providing an opportunity to demonstrate the manual execution feature. Here's how you will proceed:
- Initiate a Transfer: You'll transfer tokens and arbitrary data from your source contract on Avalanche Fuji to a receiver contract on Polygon Mumbai. You will notice that the CCIP message has a very low gas limit, causing the execution on the receiver contract to fail.
- Failure of CCIP Message Delivery: Once the transaction is finalized on the source chain (Avalanche Fuji), CCIP will deliver your message to the receiver contract on the destination chain (Polygon Mumbai). You can follow the progress of your transaction using the CCIP explorer. Here, you'll observe that the execution on the receiver contract failed due to the low gas limit.
- Manual Execution via CCIP Explorer: Using the CCIP explorer, you will override the previously set gas limit and retry the execution. This process is referred to as manual execution.
- Confirm Successful Execution: After manually executing the transaction with an adequate gas limit, you'll see that the status of your CCIP message is updated to successful. This indicates that the tokens and data were correctly transferred to the receiver contract.
Before you begin
- You should understand how to write, compile, deploy, and fund a smart contract. If you need to brush up on the basics, read this tutorial, which will guide you through using the Solidity programming language, interacting with the MetaMask wallet and working within the Remix Development Environment.
- Your account must have some ETH and LINK tokens on Avalanche Fuji and MATIC tokens on Polygon Mumbai. Learn how to Acquire testnet LINK.
- Check the Supported Networks page to confirm that the tokens you will transfer are supported for your lane. In this example, you will transfer tokens from Avalanche Fuji to Polygon Mumbai so check the list of supported tokens here.
- Learn how to acquire CCIP test tokens. Following this guide, you should have CCIP-BnM tokens, and CCIP-BnM should appear in the list of your tokens in MetaMask.
- Learn how to fund your contract. This guide shows how to fund your contract in LINK, but you can use the same guide for funding your contract with any ERC20 tokens as long as they appear in the list of tokens in MetaMask.
- Follow the previous tutorial: Transfer Tokens with Data to learn how to make programmable token transfers using CCIP.
- Create a free account on tenderly. You will use tenderly to investigate the failed execution of the receiver contract.
Tutorial
In this tutorial, you'll send a text string and CCIP-BnM tokens between smart contracts on Avalanche Fuji and Polygon Mumbai using CCIP and pay transaction fees in LINK. The tutorial demonstrates setting a deliberately low gas limit in the CCIP message, causing initial execution failure on the receiver contract. You will then:
- Use the CCIP explorer to increase the gas limit.
- Manually retry the execution.
- Observe successful execution after the gas limit adjustment.
// SPDX-License-Identifier: MIT
pragma solidity 0.8.19;

import {IRouterClient} from "@chainlink/contracts-ccip/src/v0.8/ccip/interfaces/IRouterClient.sol";
import {OwnerIsCreator} from "@chainlink/contracts-ccip/src/v0.8/shared/access/OwnerIsCreator.sol";
import {Client} from "@chainlink/contracts-ccip/src/v0.8/ccip/libraries/Client.sol";
import {CCIPReceiver} from "@chainlink/contracts-ccip/src/v0.8/ccip/applications/CCIPReceiver.sol";
import {IERC20} from "@chainlink/contracts-ccip/src/v0.8/vendor/openzeppelin-solidity/v4.8.3/contracts/token/ERC20/IERC20.sol";

/**
 * THIS IS AN EXAMPLE CONTRACT THAT USES HARDCODED VALUES FOR CLARITY.
 * THIS IS AN EXAMPLE CONTRACT THAT USES UN-AUDITED CODE.
 * DO NOT USE THIS CODE IN PRODUCTION.
 */

/// @title - A simple messenger contract for transferring/receiving tokens and data across chains.
contract ProgrammableTokenTransfersLowGasLimit is CCIPReceiver, OwnerIsCreator {
    // Custom errors to provide more descriptive revert messages.
    error NotEnoughBalance(uint256 currentBalance, uint256 calculatedFees); // Used to make sure contract has enough balance to cover the fees.
    error NothingToWithdraw(); // Used when trying to withdraw Ether but there's nothing to withdraw.
    error DestinationChainNotAllowed(uint64 destinationChainSelector); // Used when the destination chain has not been allowlisted by the contract owner.
    error SourceChainNotAllowed(uint64 sourceChainSelector); // Used when the source chain has not been allowlisted by the contract owner.
    error SenderNotAllowed(address sender); // Used when the sender has not been allowlisted by the contract owner.

    // Event emitted when a message is sent to another chain.
    event MessageSent(
        bytes32 indexed messageId, // The unique ID of the CCIP message.
        uint64 indexed destinationChainSelector, // The chain selector of the destination chain.
        address receiver, // The address of the receiver on the destination chain.
        string text, // The text being sent.
        address token, // The token address that was transferred.
        uint256 tokenAmount, // The token amount that was transferred.
        address feeToken, // the token address used to pay CCIP fees.
        uint256 fees // The fees paid for sending the message.
    );

    // Event emitted when a message is received from another chain.
    event MessageReceived(
        bytes32 indexed messageId, // The unique ID of the CCIP message.
        uint64 indexed sourceChainSelector, // The chain selector of the source chain.
        address sender, // The address of the sender from the source chain.
        string text, // The text that was received.
        address token, // The token address that was transferred.
        uint256 tokenAmount // The token amount that was transferred.
    );

    bytes32 private s_lastReceivedMessageId; // Store the last received messageId.
    address private s_lastReceivedTokenAddress; // Store the last received token address.
    uint256 private s_lastReceivedTokenAmount; // Store the last received amount.
    string private s_lastReceivedText; // Store the last received text.

    // Mapping to keep track of allowlisted destination chains.
    mapping(uint64 => bool) public allowlistedDestinationChains;

    // Mapping to keep track of allowlisted source chains.
    mapping(uint64 => bool) public allowlistedSourceChains;

    // Mapping to keep track of allowlisted senders.
    mapping(address => bool) public allowlistedSenders;

    IERC20 private s_linkToken;

    /// @notice Constructor initializes the contract with the router address.
    /// @param _router The address of the router contract.
    /// @param _link The address of the link contract.
    constructor(address _router, address _link) CCIPReceiver(_router) {
        s_linkToken = IERC20(_link);
    }

    /// @dev Modifier that checks if the chain with the given destinationChainSelector is allowlisted.
    /// @param _destinationChainSelector The selector of the destination chain.
    modifier onlyAllowlistedDestinationChain(uint64 _destinationChainSelector) {
        if (!allowlistedDestinationChains[_destinationChainSelector])
            revert DestinationChainNotAllowed(_destinationChainSelector);
        _;
    }

    /// @dev Modifier that checks if the chain with the given sourceChainSelector is allowlisted and if the sender is allowlisted.
    /// @param _sourceChainSelector The selector of the destination chain.
    /// @param _sender The address of the sender.
    modifier onlyAllowlisted(uint64 _sourceChainSelector, address _sender) {
        if (!allowlistedSourceChains[_sourceChainSelector])
            revert SourceChainNotAllowed(_sourceChainSelector);
        if (!allowlistedSenders[_sender]) revert SenderNotAllowed(_sender);
        _;
    }

    /// @dev Updates the allowlist status of a destination chain for transactions.
    /// @notice This function can only be called by the owner.
    /// @param _destinationChainSelector The selector of the destination chain to be updated.
    /// @param allowed The allowlist status to be set for the destination chain.
    function allowlistDestinationChain(
        uint64 _destinationChainSelector,
        bool allowed
    ) external onlyOwner {
        allowlistedDestinationChains[_destinationChainSelector] = allowed;
    }

    /// @dev Updates the allowlist status of a source chain
    /// @notice This function can only be called by the owner.
    /// @param _sourceChainSelector The selector of the source chain to be updated.
    /// @param allowed The allowlist status to be set for the source chain.
    function allowlistSourceChain(
        uint64 _sourceChainSelector,
        bool allowed
    ) external onlyOwner {
        allowlistedSourceChains[_sourceChainSelector] = allowed;
    }

    /// @dev Updates the allowlist status of a sender for transactions.
    /// @notice This function can only be called by the owner.
    /// @param _sender The address of the sender to be updated.
    /// @param allowed The allowlist status to be set for the sender.
    function allowlistSender(address _sender, bool allowed) external onlyOwner {
        allowlistedSenders[_sender] = allowed;
    }

    /// @notice Sends data and transfer tokens to receiver on the destination chain.
    /// @notice Pay for fees in LINK.
    /// @notice the gasLimit is set to 20_000 on purpose to force the execution to fail on the destination chain
    /// @dev Assumes your contract has sufficient LINK to pay for CCIP fees.
    /// @param _destinationChainSelector The identifier (aka selector) for the destination blockchain.
    /// @param _receiver The address of the recipient on the destination blockchain.
    /// @param _text The string data to be sent.
    /// @param _token token address.
    /// @param _amount token amount.
    /// @return messageId The ID of the CCIP message that was sent.
    function sendMessagePayLINK(
        uint64 _destinationChainSelector,
        address _receiver,
        string calldata _text,
        address _token,
        uint256 _amount
    )
        external
        onlyOwner
        onlyAllowlistedDestinationChain(_destinationChainSelector)
        returns (bytes32 messageId)
    {
        // Set the token amounts
        Client.EVMTokenAmount[]
            memory tokenAmounts = new Client.EVMTokenAmount[](1);
        tokenAmounts[0] = Client.EVMTokenAmount({
            token: _token,
            amount: _amount
        });

        // Create an EVM2AnyMessage struct in memory with necessary information for sending a cross-chain message
        // address(linkToken) means fees are paid in LINK

        Client.EVM2AnyMessage memory evm2AnyMessage = Client.EVM2AnyMessage({
            receiver: abi.encode(_receiver), // ABI-encoded receiver address
            data: abi.encode(_text), // ABI-encoded string
            tokenAmounts: tokenAmounts, // The amount and type of token being transferred
            extraArgs: Client._argsToBytes(
                // gasLimit set to 20_000 on purpose to force the execution to fail on the destination chain
                Client.EVMExtraArgsV1({gasLimit: 20_000})
            ),
            // Set the feeToken to a LINK token address
            feeToken: address(s_linkToken)
        });

        // Initialize a router client instance to interact with cross-chain router
        IRouterClient router = IRouterClient(this.getRouter());

        // Get the fee required to send the CCIP message
        uint256 fees = router.getFee(_destinationChainSelector, evm2AnyMessage);

        if (fees > s_linkToken.balanceOf(address(this)))
            revert NotEnoughBalance(s_linkToken.balanceOf(address(this)), fees);

        // approve the Router to transfer LINK tokens on contract's behalf. It will spend the fees in LINK
        s_linkToken.approve(address(router), fees);

        // approve the Router to spend tokens on contract's behalf. It will spend the amount of the given token
        IERC20(_token).approve(address(router), _amount);

        // Send the message through the router and store the returned message ID
        messageId = router.ccipSend(_destinationChainSelector, evm2AnyMessage);

        // Emit an event with message details
        emit MessageSent(
            messageId,
            _destinationChainSelector,
            _receiver,
            _text,
            _token,
            _amount,
            address(s_linkToken),
            fees
        );

        // Return the message ID
        return messageId;
    }

    /**
     * @notice Returns the details of the last CCIP received message.
     * @dev This function retrieves the ID, text, token address, and token amount of the last received CCIP message.
     * @return messageId The ID of the last received CCIP message.
     * @return text The text of the last received CCIP message.
     * @return tokenAddress The address of the token in the last CCIP received message.
     * @return tokenAmount The amount of the token in the last CCIP received message.
     */
    function getLastReceivedMessageDetails()
        public
        view
        returns (
            bytes32 messageId,
            string memory text,
            address tokenAddress,
            uint256 tokenAmount
        )
    {
        return (
            s_lastReceivedMessageId,
            s_lastReceivedText,
            s_lastReceivedTokenAddress,
            s_lastReceivedTokenAmount
        );
    }

    /// handle a received message
    function _ccipReceive(
        Client.Any2EVMMessage memory any2EvmMessage
    )
        internal
        override
        onlyAllowlisted(
            any2EvmMessage.sourceChainSelector,
            abi.decode(any2EvmMessage.sender, (address))
        ) // Make sure source chain and sender are allowlisted
    {
        s_lastReceivedMessageId = any2EvmMessage.messageId; // fetch the messageId
        s_lastReceivedText = abi.decode(any2EvmMessage.data, (string)); // abi-decoding of the sent text
        // Expect one token to be transferred at once, but you can transfer several tokens.
        s_lastReceivedTokenAddress = any2EvmMessage.destTokenAmounts[0].token;
        s_lastReceivedTokenAmount = any2EvmMessage.destTokenAmounts[0].amount;

        emit MessageReceived(
            any2EvmMessage.messageId,
            any2EvmMessage.sourceChainSelector, // fetch the source chain identifier (aka selector)
            abi.decode(any2EvmMessage.sender, (address)), // abi-decoding of the sender address,
            abi.decode(any2EvmMessage.data, (string)),
            any2EvmMessage.destTokenAmounts[0].token,
            any2EvmMessage.destTokenAmounts[0].amount
        );
    }

    /// @notice Allows the owner of the contract to withdraw all tokens of a specific ERC20 token.
    /// @dev This function reverts with a 'NothingToWithdraw' error if there are no tokens to withdraw.
    /// @param _beneficiary The address to which the tokens will be sent.
    /// @param _token The contract address of the ERC20 token to be withdrawn.
    function withdrawToken(
        address _beneficiary,
        address _token
    ) public onlyOwner {
        // Retrieve the balance of this contract
        uint256 amount = IERC20(_token).balanceOf(address(this));

        // Revert if there is nothing to withdraw
        if (amount == 0) revert NothingToWithdraw();

        IERC20(_token).transfer(_beneficiary, amount);
    }
}
Deploy your contracts
To use this contract:
-
Compile your contract.
-
Deploy, fund your sender contract on Avalanche Fuji and enable sending messages to Polygon Mumbai:
- Open MetaMask and select the network Avalanche Fuji.
- In Remix IDE, click on Deploy & Run Transactions and select Injected Provider - MetaMask from the environment list. Remix will then interact with your MetaMask wallet to communicate with Avalanche Fuji.
- Fill in your blockchain's router and LINK contract addresses. The router address can be found on the supported networks page and the LINK contract address on the LINK token contracts page. For Avalanche Fuji, the router address is
0xF694E193200268f9a4868e4Aa017A0118C9a8177and the LINK contract address is0x0b9d5D9136855f6FEc3c0993feE6E9CE8a297846. - Click the transact button. After you confirm the transaction, the contract address appears on the Deployed Contracts list. Note your contract address.
- Open MetaMask and fund your contract with CCIP-BnM tokens. You can transfer
0.002CCIP-BnM to your contract. - Open MetaMask and fund your contract with LINK tokens. You can transfer
0.1LINK to your contract. In this example, LINK is used to pay the CCIP fees. - Enable your contract to send CCIP messages to Polygon Mumbai:
- In Remix IDE, under Deploy & Run Transactions, open the list of transactions of your smart contract deployed on Avalanche Fuji.
- Call the
allowlistDestinationChainwith12532609583862916517as the destination chain selector, andtrueas allowed. Each chain selector is found on the supported networks page.
-
Deploy your receiver contract on Polygon Mumbai and enable receiving messages from your sender contract:
- Open MetaMask and select the network Polygon Mumbai.
- In Remix IDE, under Deploy & Run Transactions, make sure the environment is still Injected Provider - MetaMask.
- Fill in your blockchain's router and LINK contract addresses. The router address can be found on the supported networks page and the LINK contract address on the LINK token contracts page. For Polygon Mumbai, the router address is
0x1035CabC275068e0F4b745A29CEDf38E13aF41b1and the LINK contract address is0x326C977E6efc84E512bB9C30f76E30c160eD06FB. - Click the transact button. After you confirm the transaction, the contract address appears on the Deployed Contracts list. Note your contract address.
- Enable your contract to receive CCIP messages from Avalanche Fuji:
- In Remix IDE, under Deploy & Run Transactions, open the list of transactions of your smart contract deployed on Polygon Mumbai.
- Call the
allowlistSourceChainwith14767482510784806043as the source chain selector, andtrueas allowed. Each chain selector is found on the supported networks page.
- Enable your contract to receive CCIP messages from the contract that you deployed on Avalanche Fuji:
- In Remix IDE, under Deploy & Run Transactions, open the list of transactions of your smart contract deployed on Polygon Mumbai.
- Call the
allowlistSenderwith the contract address of the contract that you deployed on Avalanche Fuji, andtrueas allowed.
At this point, you have one sender contract on Avalanche Fuji and one receiver contract on Polygon Mumbai. As security measures, you enabled the sender contract to send CCIP messages to Polygon Mumbai and the receiver contract to receive CCIP messages from the sender and Avalanche Fuji.
Transfer and Receive tokens and data and pay in LINK
You will transfer 0.001 CCIP-BnM and a text. The CCIP fees for using CCIP will be paid in LINK.
-
Send a string data with tokens from Avalanche Fuji:
-
Open MetaMask and select the network Avalanche Fuji.
-
In Remix IDE, under Deploy & Run Transactions, open the list of transactions of your smart contract deployed on Avalanche Fuji.
-
Fill in the arguments of the sendMessagePayLINK function:
Argument Value and Description _destinationChainSelector 12532609583862916517
CCIP Chain identifier of the destination blockchain (Polygon Mumbai in this example). You can find each chain selector on the supported networks page._receiver Your receiver contract address at Polygon Mumbai.
The destination contract address._text Hello World!
Anystring_token 0xD21341536c5cF5EB1bcb58f6723cE26e8D8E90e4
The CCIP-BnM contract address at the source chain (Avalanche Fuji in this example). You can find all the addresses for each supported blockchain on the supported networks page._amount 1000000000000000
The token amount (0.001 CCIP-BnM). -
Click on
transactand confirm the transaction on MetaMask. -
After the transaction is successful, record the transaction hash. Here is an example of a transaction on Avalanche Fuji.
-
-
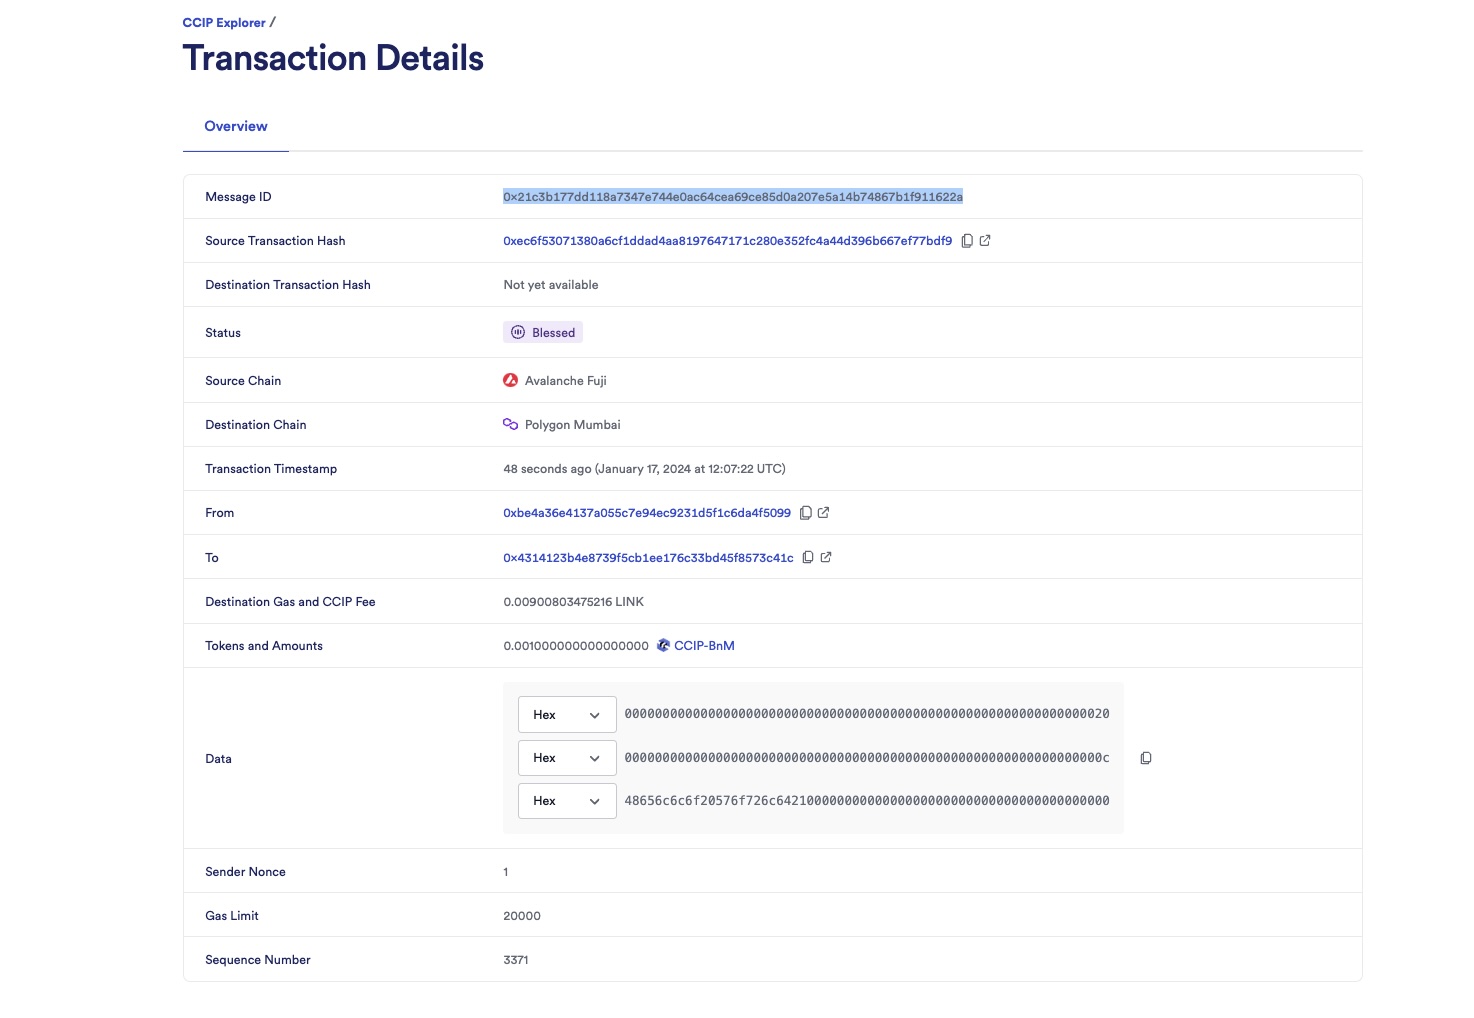
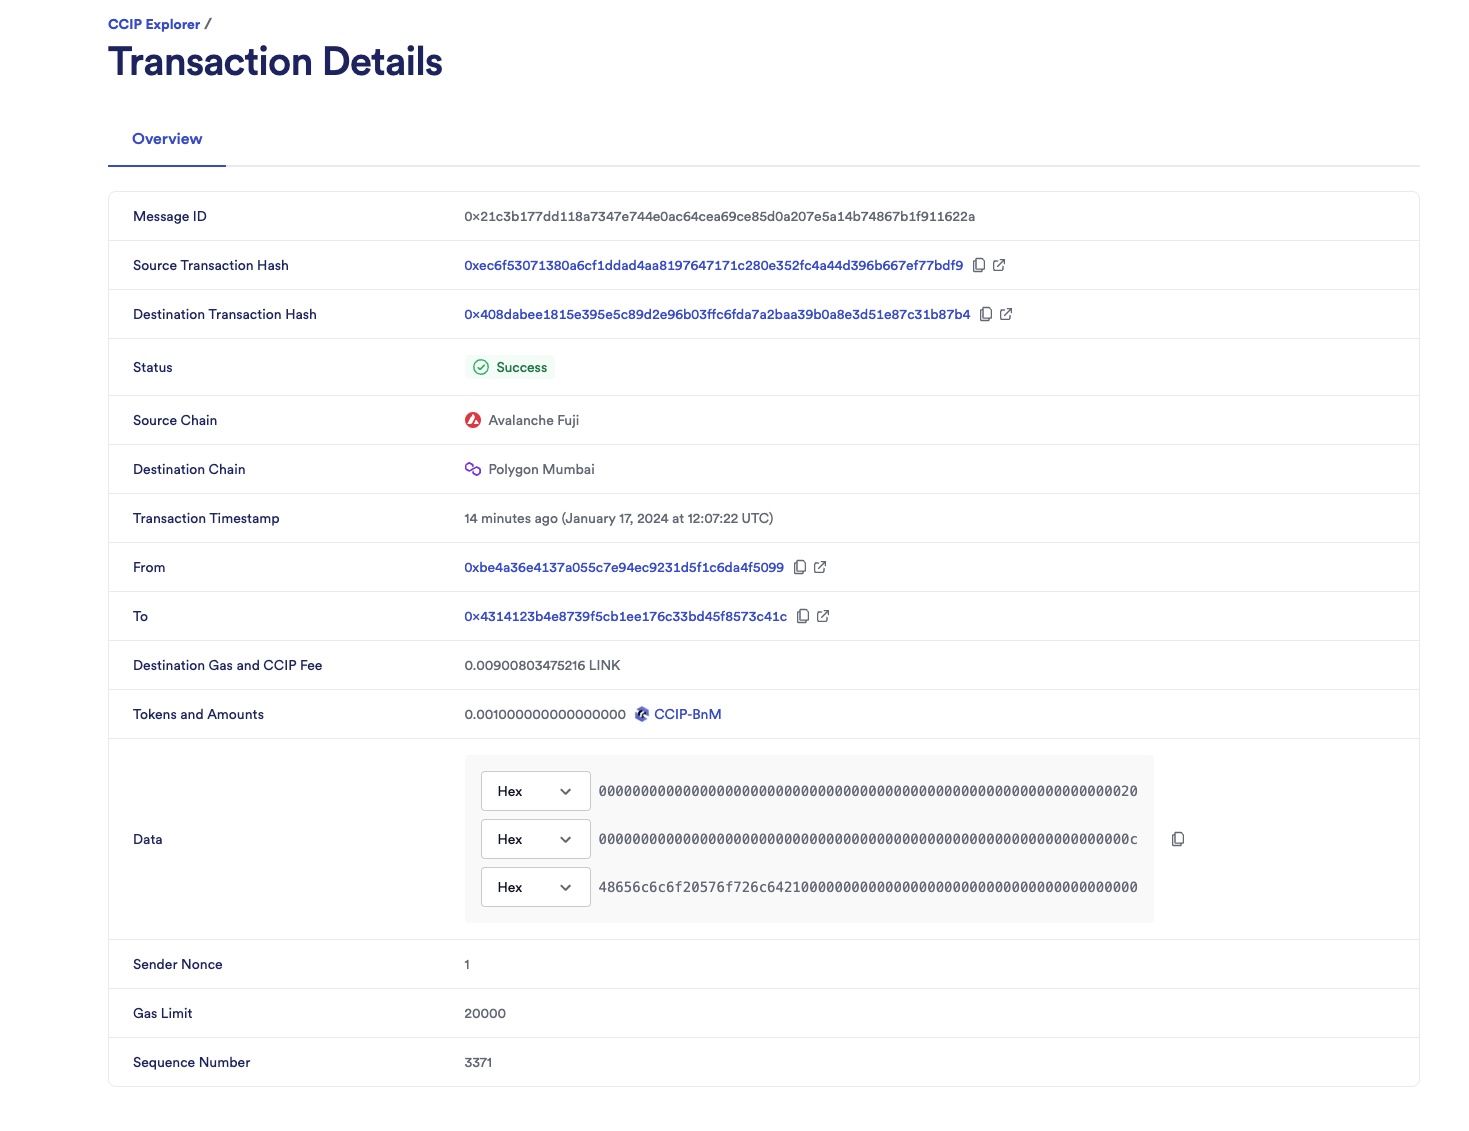
Open the CCIP explorer and search your cross-chain transaction using the transaction hash. Note that the Gas Limit is 20000. In this example, the CCIP message ID is 0x21c3b177dd118a7347e744e0ac64cea69ce85d0a207e5a14b74867b1f911622a.
-
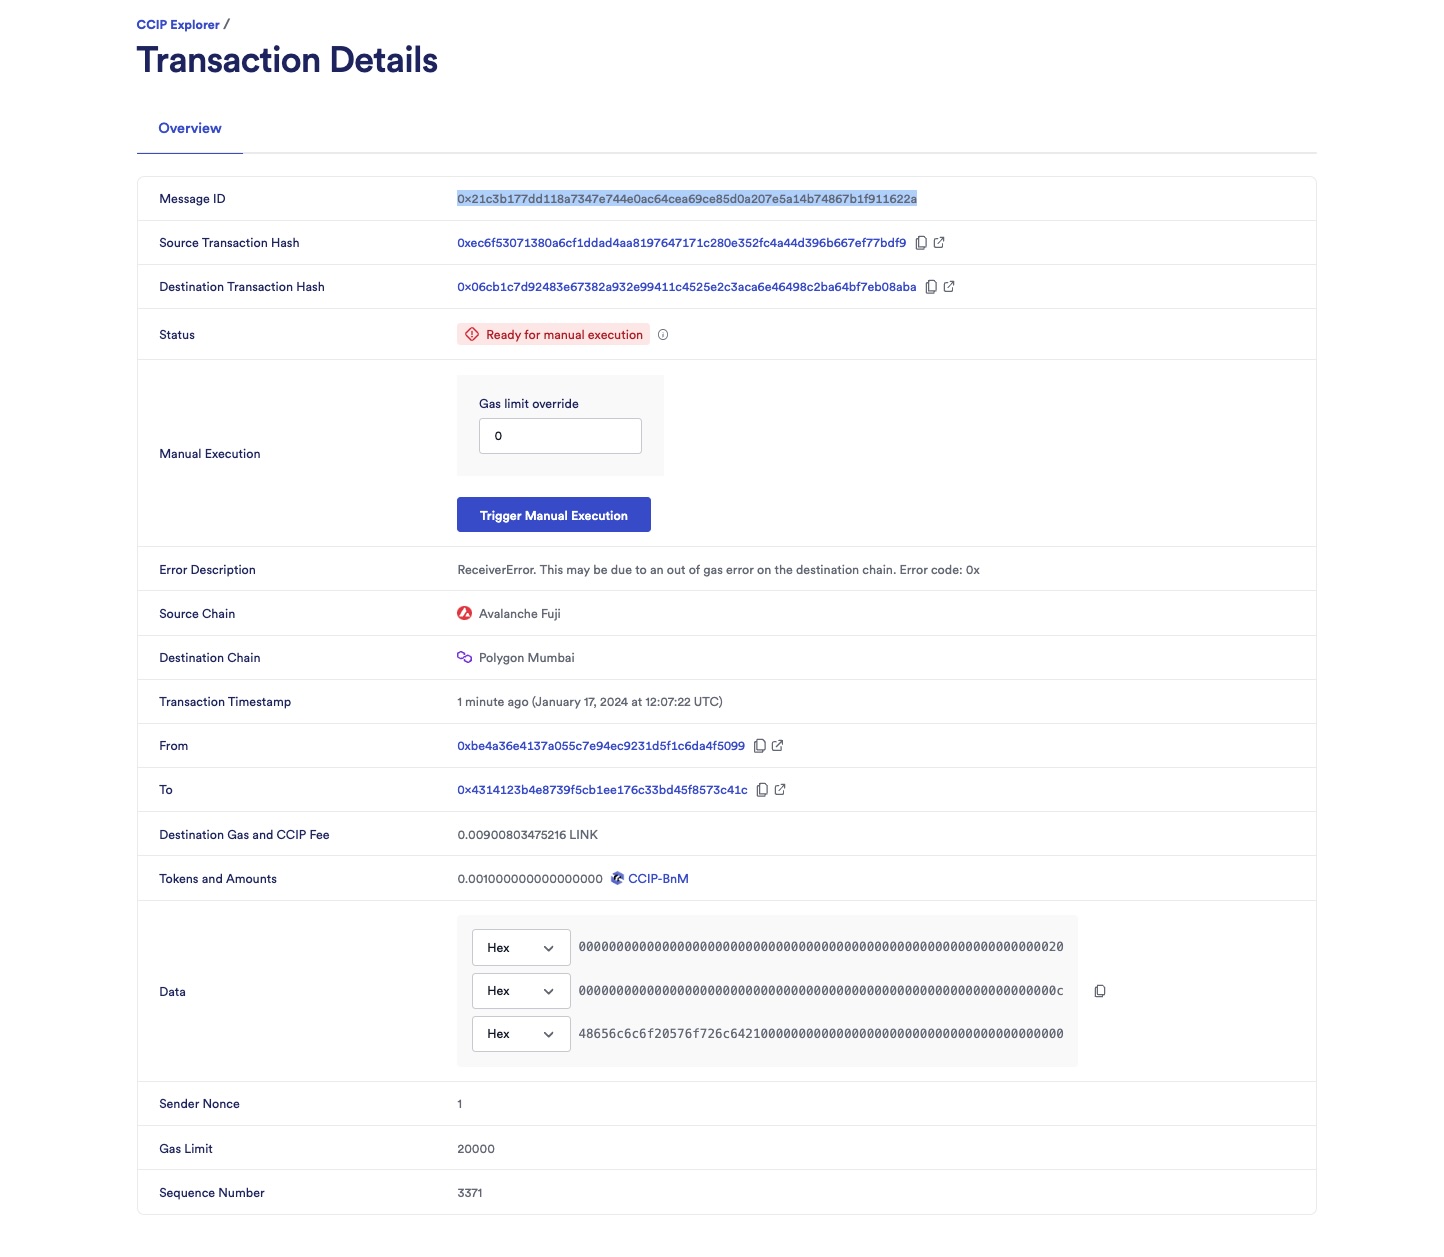
After a few minutes, the status will be updated to Ready for manual execution indicating that CCIP could not successfully deliver the message due to the initial low gas limit. At this stage, you have the option to override the gas limit.
-
You can also confirm that the CCIP message was not delivered to the receiver contract on the destination chain:
-
Open MetaMask and select the network Polygon Mumbai.
-
In Remix IDE, under Deploy & Run Transactions, open the list of transactions of your smart contract deployed on Polygon Mumbai.
-
Call the
getLastReceivedMessageDetailsfunction.

-
Observe that the returned data is empty: the received messageId is 0x0000000000000000000000000000000000000000000000000000000000000000, indicating no message was received. Additionally, the received text field is empty, the token address is the default 0x0000000000000000000000000000000000000000, and the token amount shows as 0.
-
Manual execution
Investigate the root cause of receiver contract execution failure
To determine if a low gas limit is causing the failure in the receiver contract's execution, consider the following methods:
-
Error analysis: Examine the error description in the CCIP explorer. An error labeled ReceiverError. This may be due to an out of gas error on the destination chain. Error code: 0x, often indicates a low gas issue
-
Advanced Investigation Tool: For a comprehensive analysis, employ a sophisticated tool like tenderly. Tenderly can provide detailed insights into the transaction processes, helping to pinpoint the exact cause of the failure.
To use tenderly:
-
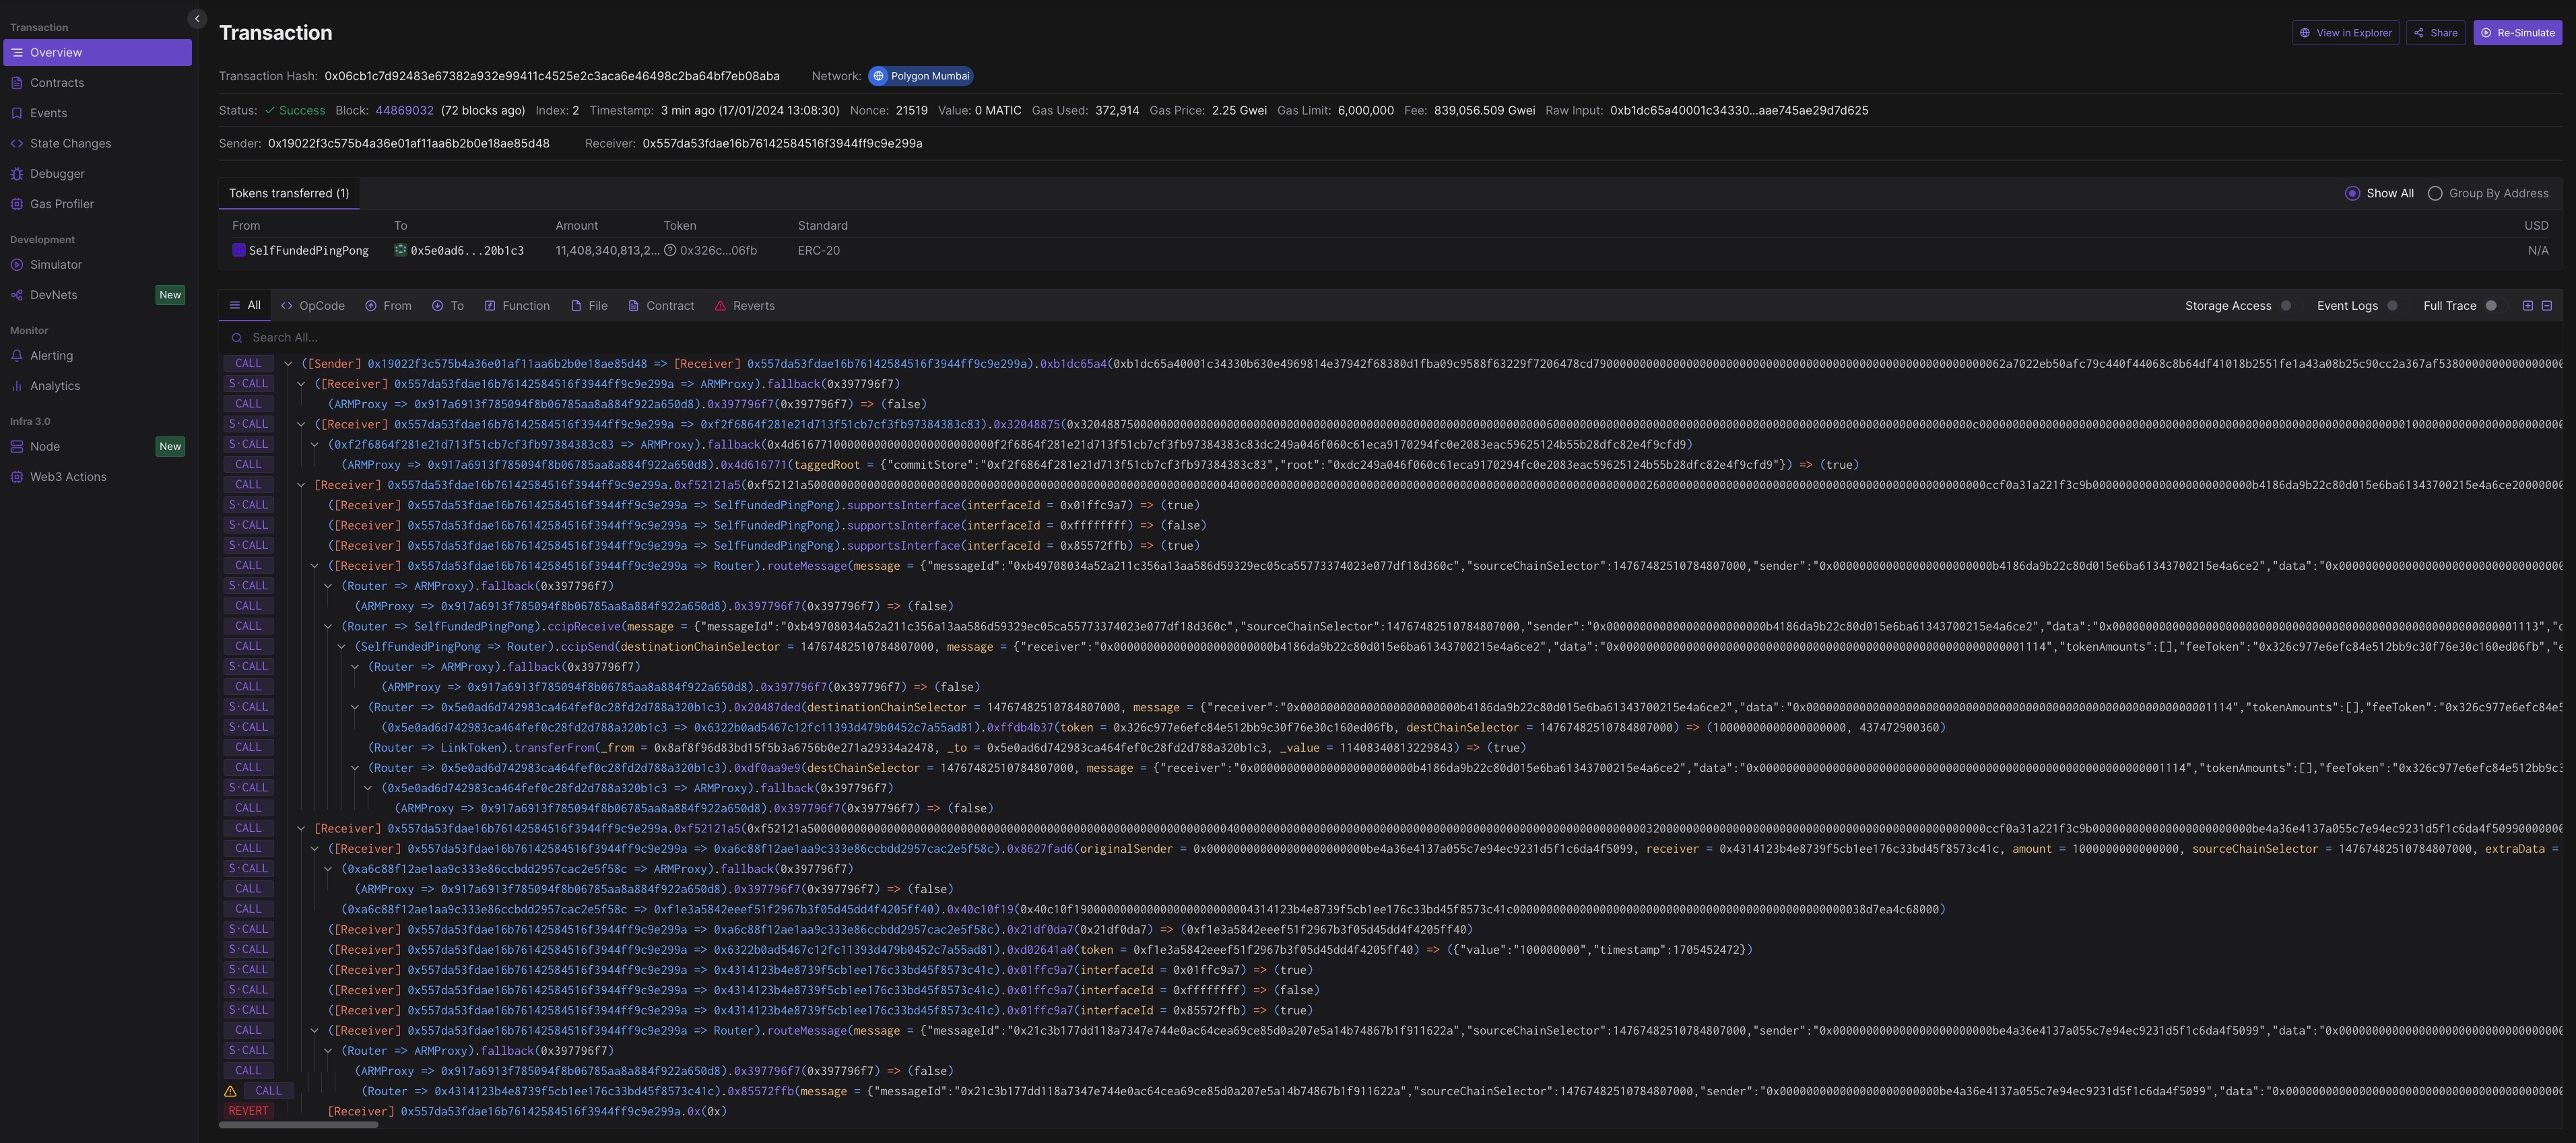
Copy the destination transaction hash from the CCIP explorer. In this example, the destination transaction hash is 0x06cb1c7d92483e67382a932e99411c4525e2c3aca6e46498c2ba64bf7eb08aba.
-
Open tenderly and search for your transaction. You should see an interface similar to the following:
-
Enable Full Trace then click on Reverts.

-
Notice the out of gas error in the receiver contract. In this example, the receiver contract is 0x4314123b4E8739f5cb1eE176C33Bd45f8573c41C.
Trigger manual execution
You will increase the gas limit and trigger manual execution:
-
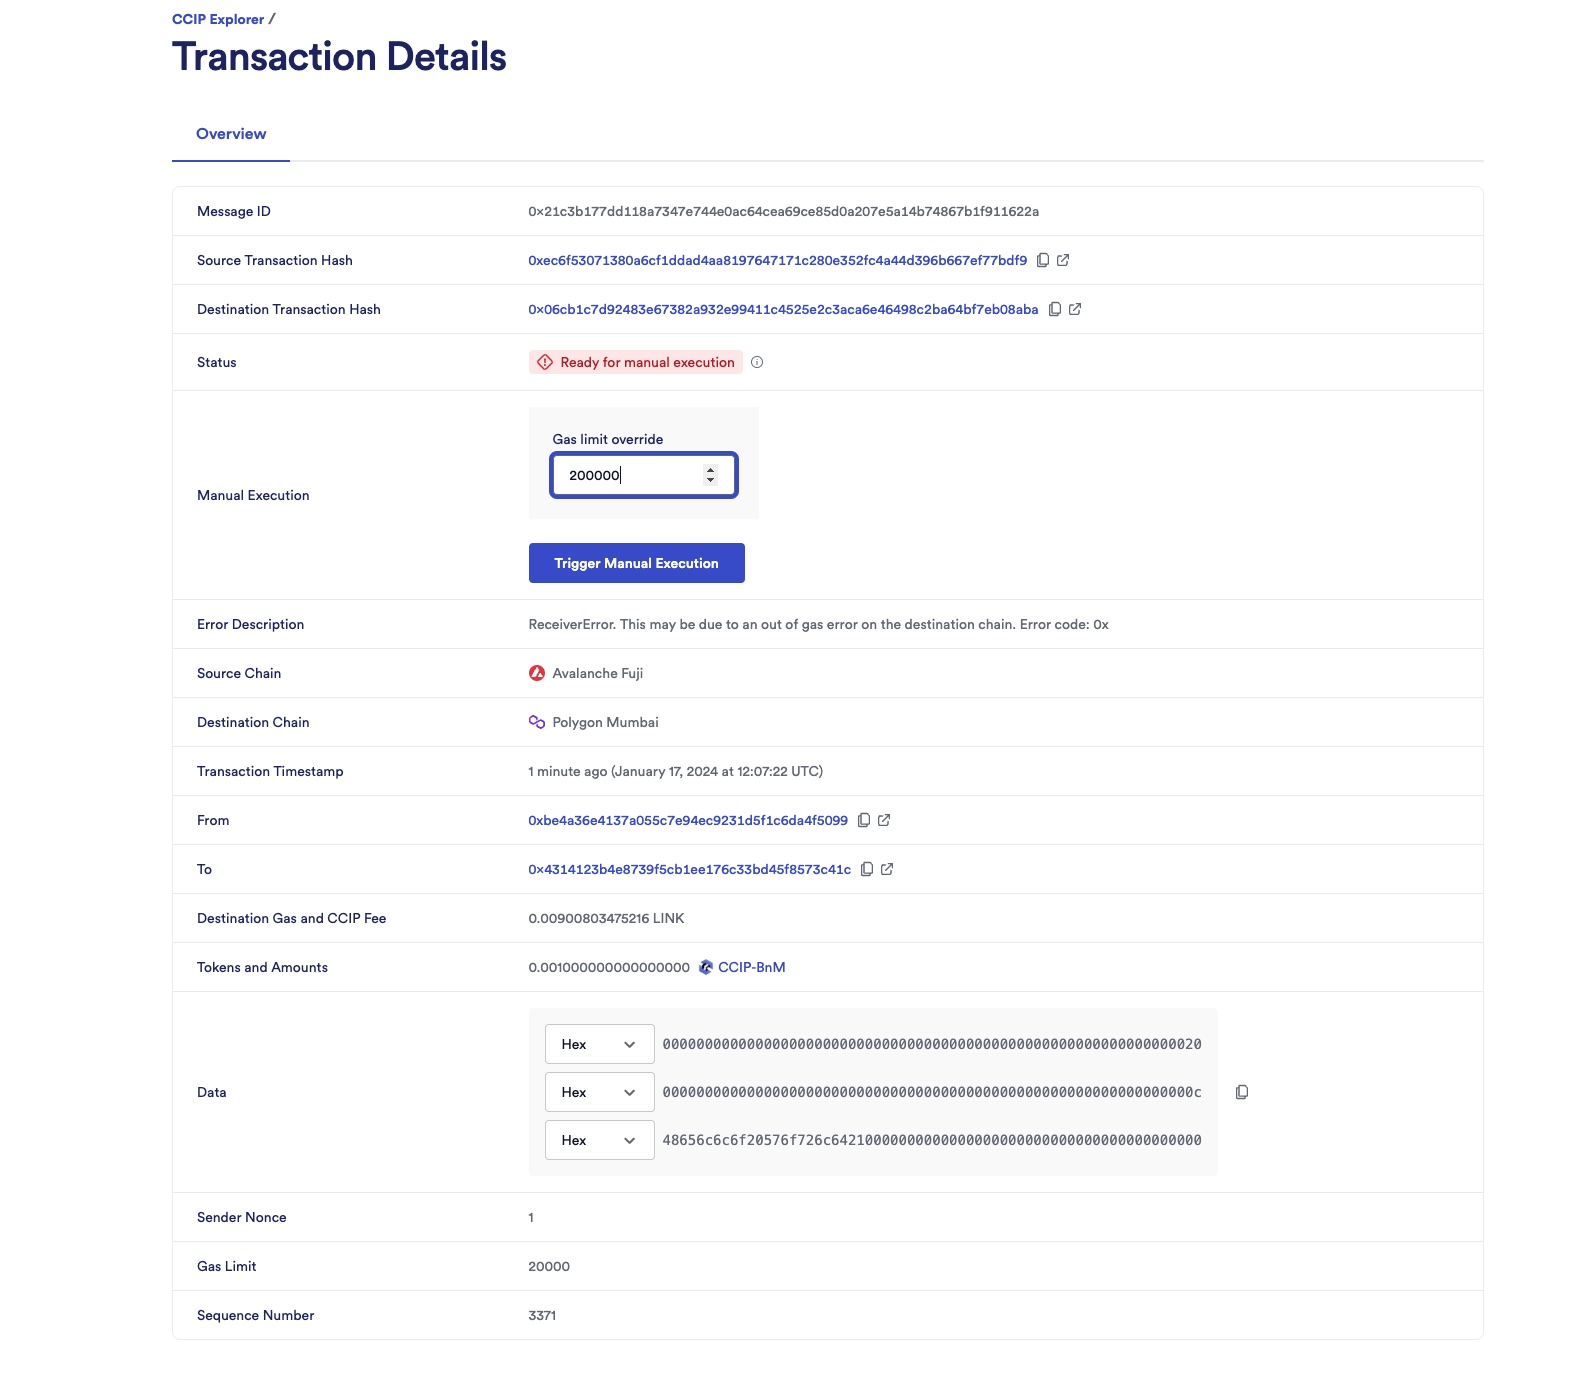
In the CCIP explorer, set the Gas limit override to
200000then click on Trigger Manual Execution.
-
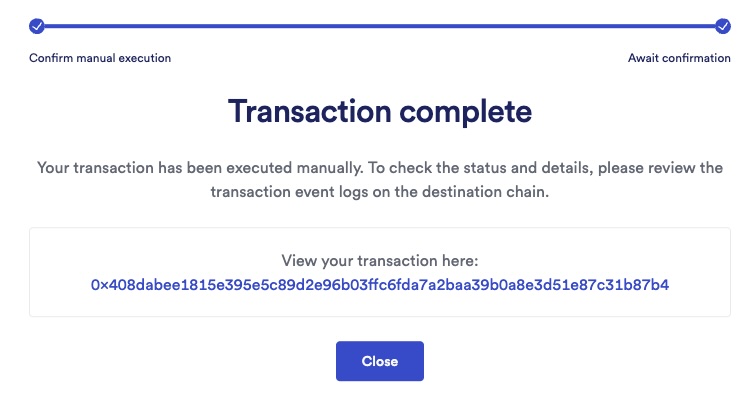
After you confirm the transaction on Metamask, the CCIP explorer shows you a confirmation screen.
-
Click on the Close button and observe the status marked as Success.
-
Check the receiver contract on the destination chain:
-
Open MetaMask and select the network Polygon Mumbai.
-
In Remix IDE, under Deploy & Run Transactions, open the list of transactions of your smart contract deployed on Polygon Mumbai.
-
Call the
getLastReceivedMessageDetailsfunction.

-
Notice the received messageId is 0x21c3b177dd118a7347e744e0ac64cea69ce85d0a207e5a14b74867b1f911622a, the received text is Hello World!, the token address is 0xf1E3A5842EeEF51F2967b3F05D45DD4f4205FF40 (CCIP-BnM token address on Polygon Mumbai) and the token amount is 1000000000000000 (0.001 CCIP-BnM).
-
Note: These example contracts are designed to work bi-directionally. As an exercise, you can use them to transfer tokens and data from Avalanche Fuji to Polygon Mumbai and from Polygon Mumbai back to Avalanche Fuji.
Explanation
The smart contract used in this tutorial is configured to use CCIP for transferring and receiving tokens with data, similar to the contract in the Transfer Tokens with Data tutorial. For a detailed understanding of the contract code, refer to the code explanation section of that tutorial.
A key distinction in this tutorial is the intentional setup of a low gas limit of 20,000 for building the CCIP message. This specific gas limit setting is expected to fail the message delivery on the receiver contract in the destination chain:
Client._argsToBytes(
    Client.EVMExtraArgsV1({gasLimit: 20_000})
)